Techart Pro adapter: user experience and how to adapt non Leica M lenses

This is a guest post from Bui Le Minh. To write a guest post follow the instructions on that page. Thanks!

———————-

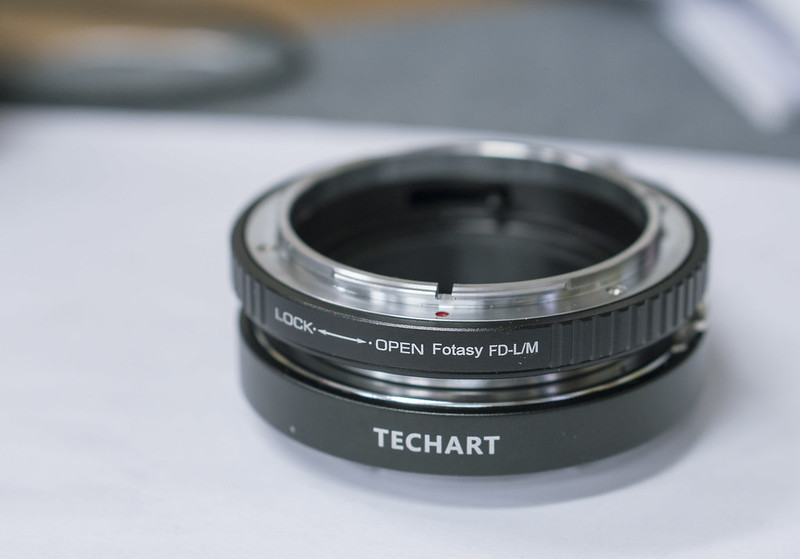
As many people here including me were excited with the release of [shoplink 48291 ebay]Techart Pro adapter for autofocusing MF lenses (Leica M mount)[/shoplink] on A7ii/A7Rii/A6300, I pre-ordered this adapter on February and just got it few days ago. Since this adapter is designed to use with Leica M lenses but I don’t have any, I decided to get Canon EF – Leica M and Canon FD – Leica M adapters to add the Leica M mount to most of my lenses, then mount them on the Techart Pro (which was demonstrated on their videos). However, there are few things they don’t mention in their website that I think we should take account of:
– For non-Leica M users like me: only Techart adapters for adapting other lenses to Leica M system will fit the Techart Pro. Theoretically we just simply need to get a cheap Chinese adapter and put it on, but upon getting this adapter from Techart, I realized that mine doesn’t fit. That is because of the cover in front of Techart Pro, it’s too thick for another adapter to get in. I searched everywhere and found no adapter that is thin enough to fit. One way to fix it was mentioned by Dirk Westermann in this post: http://www.sonyalpharumors.com/yes-this-is-cool-first-canon-fd-autofocus-test-from-dirk-westermann/. However, since the adapter is metal, and even it’s plastic, it doesn’t mean everyone can reshape it to fit Techart Pro. I didn’t have any tool to do the same thing so I was very upset at first, as I had the adapter but cannot use, and because they didn’t mention anything like that. A simple way is to order extra adapters from Techart, I’m sure they will fit but it will cost extra $140, which is about half the price of the adapter, and I have to wait for long time until they’re delivered to me. Luckily, I found another way to simply fix the problem, even though it might be temporary, but it’s good enough for you to use your lenses. I will give more details below.
– Problem with IF lenses and lenses with floating element. While you can do AF with basically any lens that fit your camera, Techart didn’t mention the possibility of lowering image quality with Internal Focus lenses and lenses with Floating element. I demonstrate here how it can reduce image quality and how we can minimize the problem.

1. Simple way to adapt non Leica M lenses to use with Techart Pro
If you can’t trim the Leica M adapter to fit it into Techart Pro, you can modify the Techart Pro to fit them in a non-damaging way.
First, you need to remove the black plate covering the front side of the adapter by unscrew it from behind (there are two screws on the back)
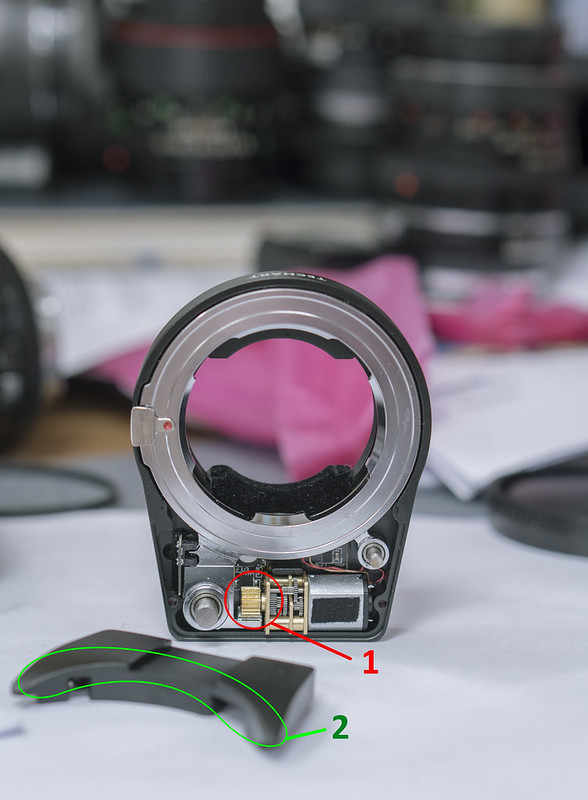
Notice the (1) part is the motor and the function of the plate is to limit the movement of the motor. The first time when I took the plate off, the motor can turn out of the designated area and kept running unstoppably (we will fix it later). The rim (2) of the plate is the reason other adapters can’t fit to Techart Pro, now it’s gone and we have plenty of space.
Since it’s not good to leave the adapter open, I covered it with a piece of hard paper, then with black tape outside.
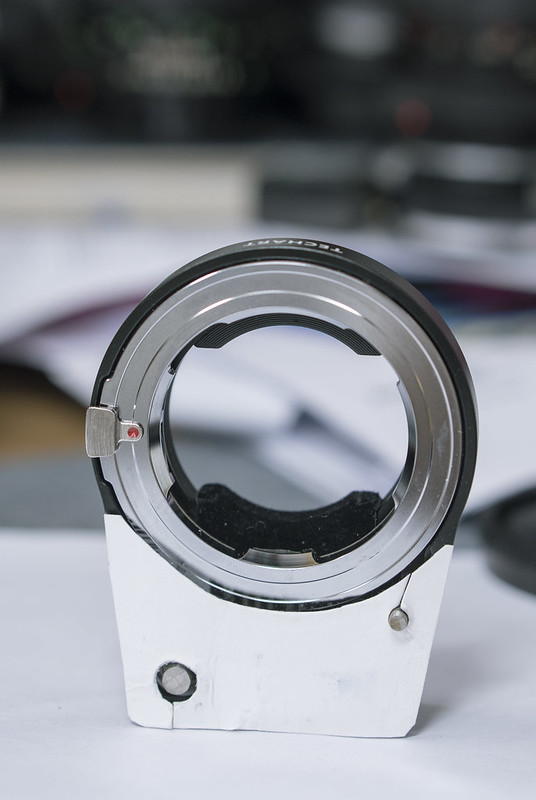
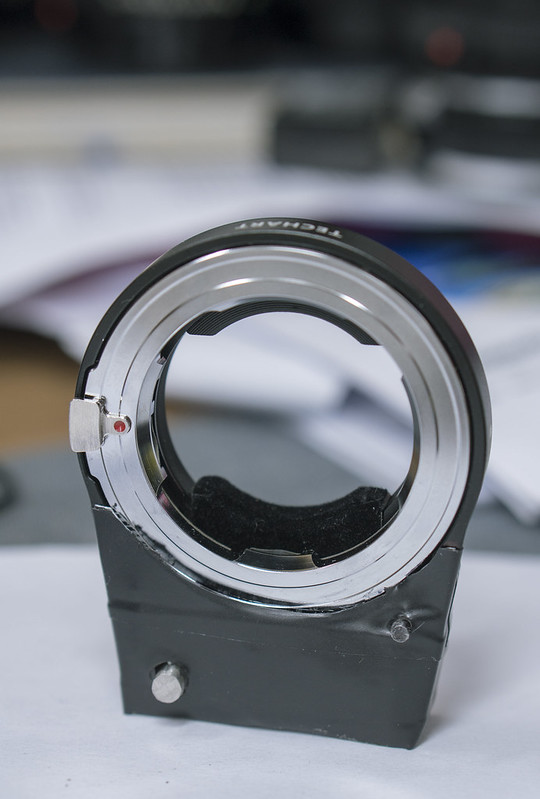
Now they’re easily fitted into each other and ready to use on your camera. Remember to keep the disassembled part carefully, in case you need to restore the original conditions.
As I mentioned earlier, the movement of the gear on the motor is needed to be constrained, other wise it will stop working when it runs out of its base. I found an easy way to keep it fixed without using glue: find a big paper clamp, it’s hard enough.
Doing this way, you don’t have to worry about the motor anymore and it also provides you sort of “metal plate” under your camera. However, it’s not convenient to use the camera for a long time when the clamp presses on your palm. Another negative point is you have to remove your leather half case since it will prevent the adapter with the clamp to be mounted.

So now the Techart Pro is working well for me, even with heavy lenses like FD 300mm f/2.8 L. I just need a stable support like tripod or monopod and pre-focus to near-sharp focal plane, then press the button for the AF to engage and refine the focus.

2. Performance with Internal focus lenses and lenses with Floating elements

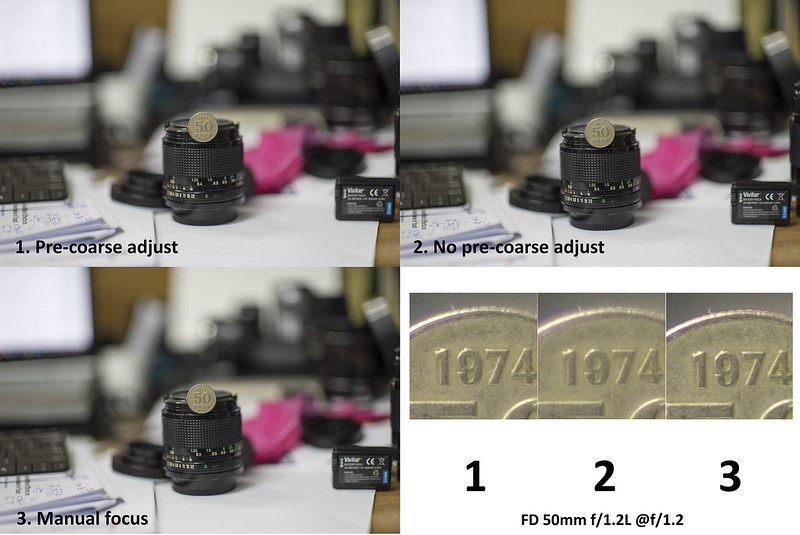
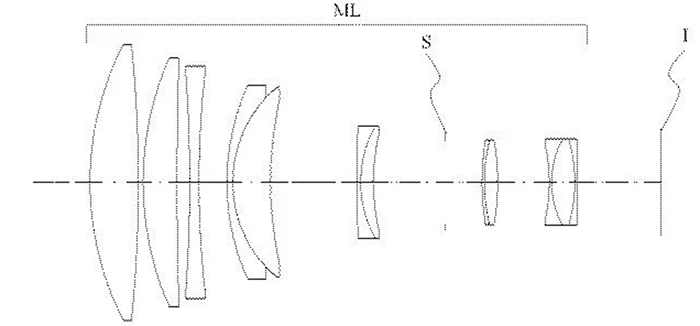
These kinds of lens need the rear element to be fixed at a certain distance to the sensor, and any movement of that element will degrade the quality of the photo. Therefore, if you just let the adapter to focus for you, there is a high chance that you will get worse image. I did some tests with Samyang 135mm T2.2 (internal focus), FD 50mm f/1.2 L (floating element), and compare with a normal one: FD 24mm f/2.
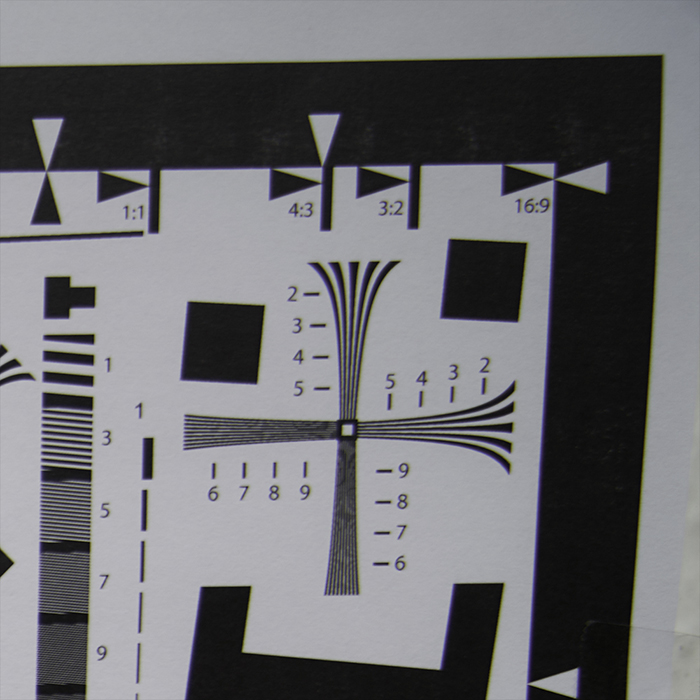
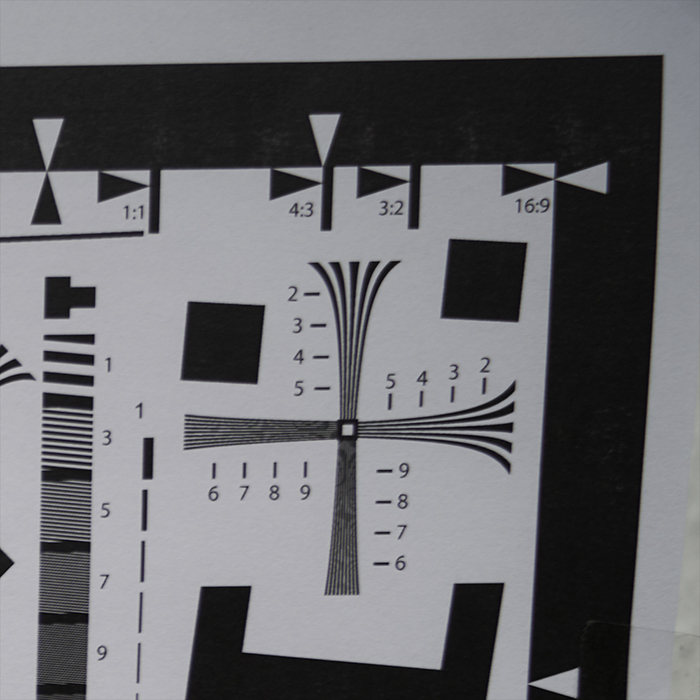
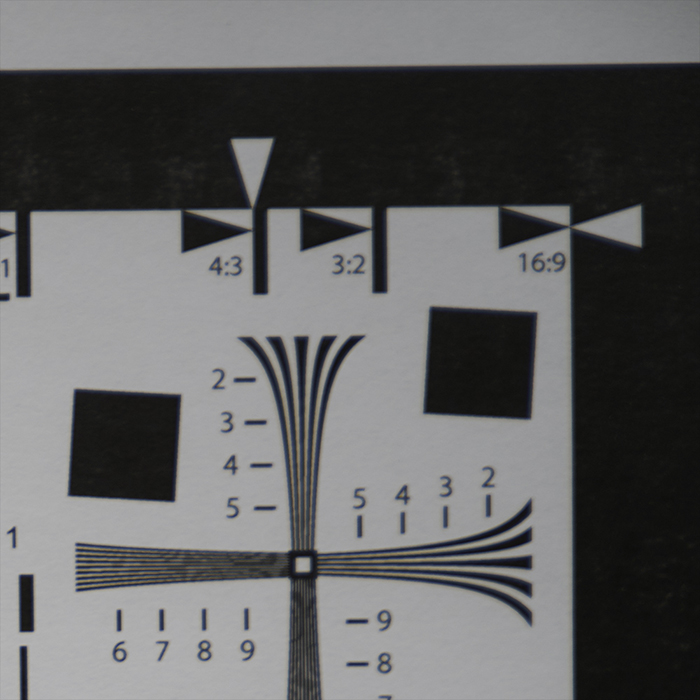
The method is first, I used MF mode to focus and shoot all by myself (image 3), and second, I turn on the AF mode and let the camera with Techart Pro to focus for me under two conditions: I did pre-coarse adjustment (image 1), which means it’s very close to a correct focus, and I didn’t do pre-coarse adjustment (image 2), or turned the focus ring away from the focus point.

Here is the result with 100% crop in the center to show the sharpness:
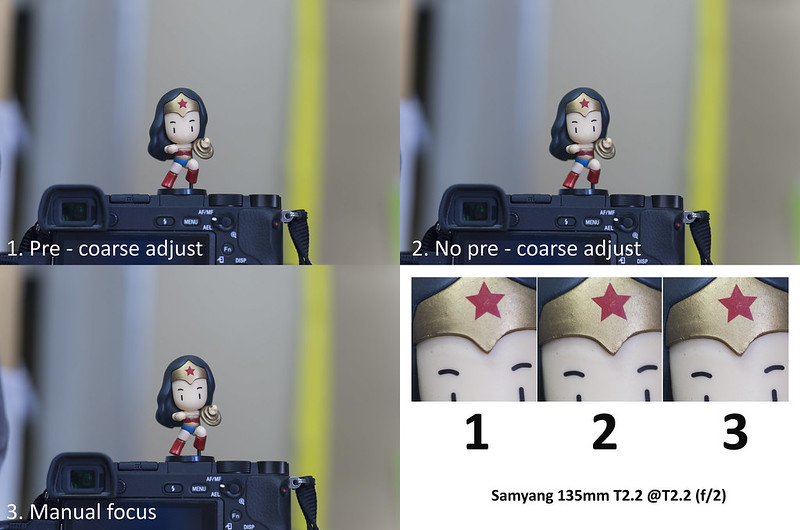


From the results, you can see that moving the rear element away from the sensor significantly reduces image quality if your lens has floating element (such as FD 50/1.2 L, 85/1.2 L), even when I did pre-coarse adjustment or the rear element moved just few mm. With internal focus lens such as Samyang lenses, the situation is brighter, as the change is not much, and I don’t see much changes with FD 24/2 neither.

I recommend to practice the pre-coarse adjustment regularly, especially when you use rather long lens, since the focus throw with these lenses is longer than normal and wide lenses and sometimes you won’t get AF with near subjects. Beside minimizing the image degradation, it also reduces time for AF to focus correctly. The last thing you should remember when you focus closely to the camera is you always need to rotate the focus ring past the focus point in order to let the AF work. Since the flange distance only can be increased, it can’t be shorten less than the native flange distance, if your focus doesn’t reach the focus point in the native lens-sensor distance, Techart Pro can’t help you.

I hope that this post will be helpful for Techart Pro users. If you have anything to ask, just reach me on my Flickr: https://www.flickr.com/photos/langstrum/
Sony 24-70mm GM review by Digitalrev: “it’s stupendously good”

Kai from Digitalrev tested the new Sony 24-70mm GM lens and was very impressed by its performance (and less by its size). He says the lens is “its stupendously good”. But as Kai pointed out we really need a bigger body for those big GM lenses :)

Jordan Steele from Admiringlight tested the new Sony 50mm FE lens and writes:

Ultimately, when you consider whether you should buy the FE 50mm f/1.8, the question you have to ask is: how important is quick autofocus to my shooting?  If you can wait for it to lock, or will be using the lens for tripod work and can manually focus, it’s quite an outstanding lens. If you are planning on using the lens for event shooting or other situations where fast and accurate autofocus is critical, you’ll want to give this lens a pass and move to the FE 55mm f/1.8.

24-70mm GM store links: [shopcountry 47915].
50mm FE store links: [shopcountry 47526].


New 85mm GM, 24-70mm GM and A6300 reviews

85mm

Jordan Steele from Admiringlight tested the new Sony 85mm GM lens:

The Sony 85mm f/1.4 GM is a lens that feels greater than the sum of its parts. Yes, it’s very sharp; it’s got great bokeh; it’s got good color and contrast. It also has some minor flaws. However, the combination of the imaging characteristics adds up to something truly special. The look that can be created with this lens is simply stunning: the sharp pop of the subject with a gorgeous fade in the background. Ultimately, it’s simply beautiful.
[shopcountry 48072]

Photogrpaphyblog tested the new 24-70mm GM lens:

Image quality is excellent. Chromatic aberrations are very well controlled, bokeh is impressive thanks to the fast f/2.8 aperture and 9-blade circular aperture, and the Nano AR Coating coatings successfully prevent contrast loss attributable to flare. The only real optical issues are some mild corner shading and slight barrel distortion at the 24mm wide-angle focal length, and a drop-off in sharpness at 35mm compared to the other main focal lengths.
[shopcountry 47915]

The A6300 got tested by Imaging Resource:

It was a tall order to improve upon the A6000, but Sony managed to pull it off. Build quality is better, image quality is better, video quality is better, and performance is better. Sure, there are some downsides, such as a still-limited selection of native crop-sensor E-mount lenses, no touchscreen and clunky menus, but the positives far outweigh the negatives in our eyes. At just under $1000 body-only, the Sony A6300 packs one heck of a punch in both features and performance, and undoubtedly gets two thumbs up as a Dave’s Pick.
[shopcountry 47396]

Mirrorlessons posted the full A6300 review too:

The autofocus performance combined with the Live View of the EVF is beyond anything we’ve seen from a mirrorless camera to date, and it comes packaged in one of the smallest bodies in the high-end mirrorless sphere. If all you shoot is sports and wildlife and are in search of a compact solution, this camera should be at the top of your list.

Dpreview: Sony RX10 III destroys the competition

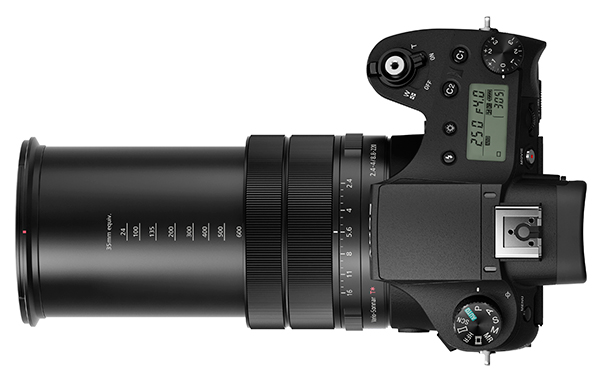
[shoplink 48252]rx10-iii_top_tele[/shoplink]
Dpreview compared the new [shoplink 48252]Sony RX10III[/shoplink] against the Panasonic FZ1000 and the Canon G3X. The Panasonic is as good as the Sony but does only go as far as 400mm. So the real contender seems to be the Canon:

The real reason people consider bridge cameras is for the reach, and Sony extended the RX10 III’s reach by a full 400mm over the RX10 II. That means it now offers the same amount of reach as the G3 X’s 600mm equivalent maximum focal length. The RX10 III’s lens is clearly sharper, but it has another thing going for it: its faster maximum aperture helps it combat diffraction. Remember that F4 and F5.6 on 1″-type cameras are equivalent to F11 and F15, respectively. Both cameras are limited by atmospheric distortion at these focal lengths (hence the drop to ‘print’ resolution in the previous comparison link), but it’s clear that the RX10 III exceeds the G3 X’s performance, while offering just as much zoom versatility. The Canon PowerShot G3 X’s trump card has been trumped.

RX10m3 store links to [shopcountry 48252].

24-70mm f/2.8 GM review by Enrico Heller

[shoplink 47915]amb1.big[/shoplink]

This is a guest post from Enrico Heller (eh-photo.de). He reviewed the new 24-70mm GM lens ([shopcountry 47915]).

——

Introduction
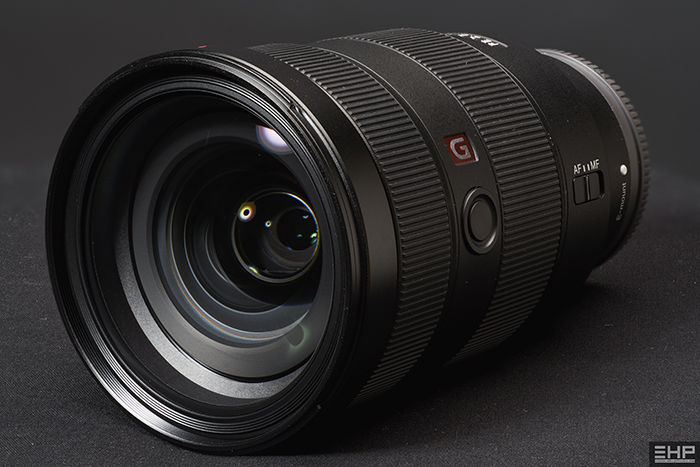
Sony finally released the long awaited, brand new [shoplink 47915]Sony FE 24-70 GM F2.8 lens[/shoplink]. I placed my preorder in Februar this year, but the demand is so high, that I needed to wait until last week to get my lens. I spend the last days with this lens and collected a lot of sample images. In my full review I want to share my impressions and results with you.
I have tested the lens with my Sony A7RM2 and as usually I started to analyse and compare the lens in my little studio. As competitor I have used the
Sony Vario-Tessar® T* FE 24–70 mm F4 ZA OSS.

Build Quality and Handling
amb2.big

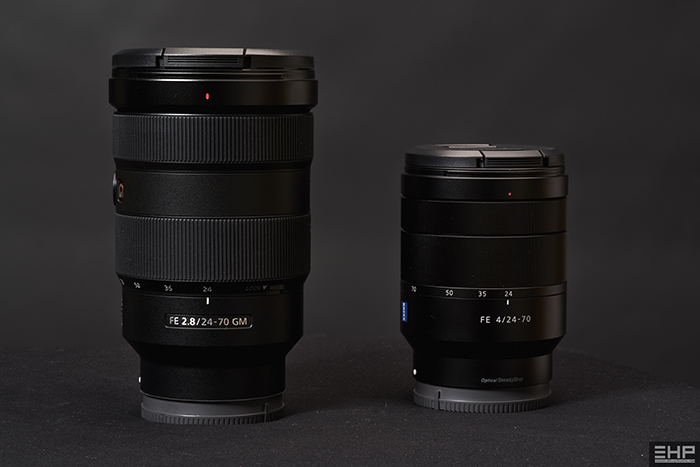
As it can be expected from such a high price tag lens the build quality is very well. The case is made of metal and feels good. The lens hood has a button to release the hood. I don’t like it much, because I hadn’t need it before and would not need this in future. But I have to learn to handle this. The lens is very heavy and bulky. The weight is 886g. In comparison the Sony FE24-70 F4 (426g) feels like a tiny toy. But before we complain about this, the
Nikon AF-S 24-70mm 1:2,8G ED is 900g and the Canon EF24-70 f/2.8L II USM is 805g. So the Sony is equal to the others.
The focus and focal length ring works very well with a nice resistance. Manual focusing works, but not far as good like on a Zeiss manual focus lens.
You get a focus lock button which is really great and a focal lenght lock button, which locks the focal lenght at 24mm.
You also get the new lens case like all new G-Master lenses have.

Autofocus
The autofocus is very fast and accurate and in contrast to the Sony FE 85 GM F1.4 (see my test HERE) nearly noiceless. I havn’t messured it but I’m sure it’s my fastest Sony lens I have ever had and I have had most of them. I don’t now how fast a adaptered Nikon or Canon lens works but I can’t imagine that they are faster. The focus nailes even in low light condition.
The Eye AF works also very well. You can nail the focus on moving people exactly in the eye.
In terms of autofocus you can use the lens for sports and event photography without hesitiation.

ehp-50.big

Sharpness
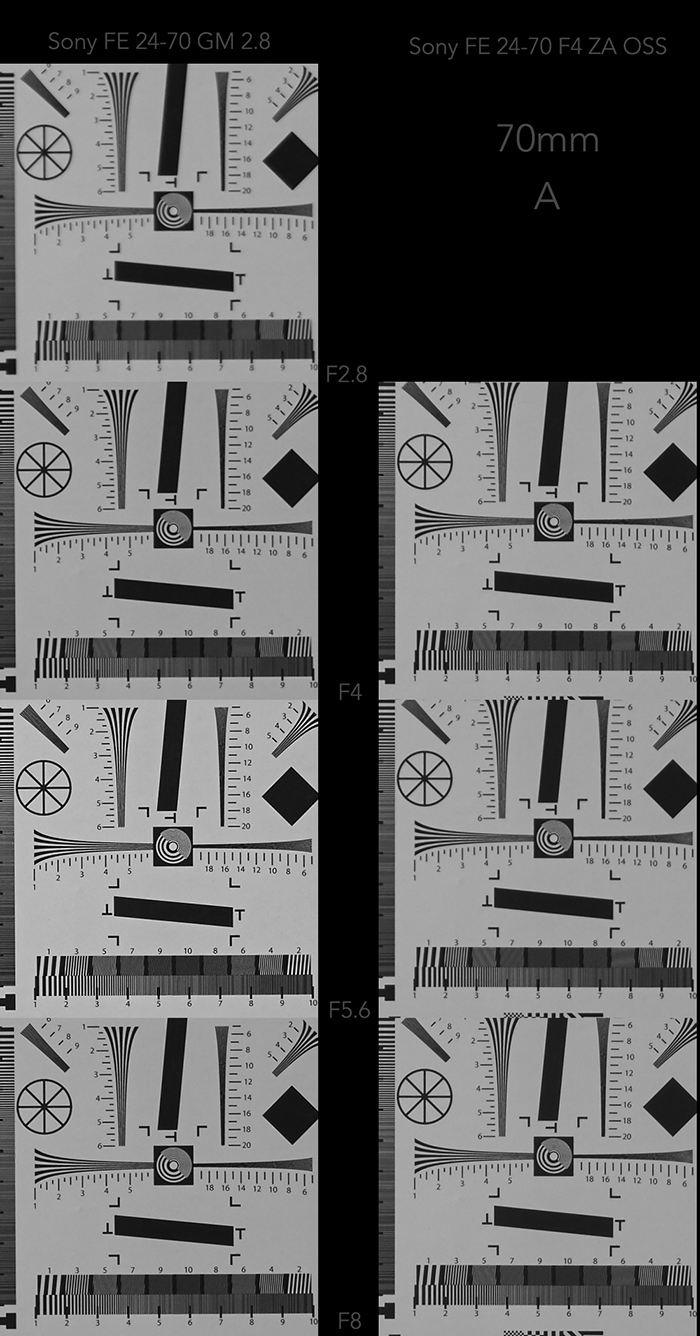
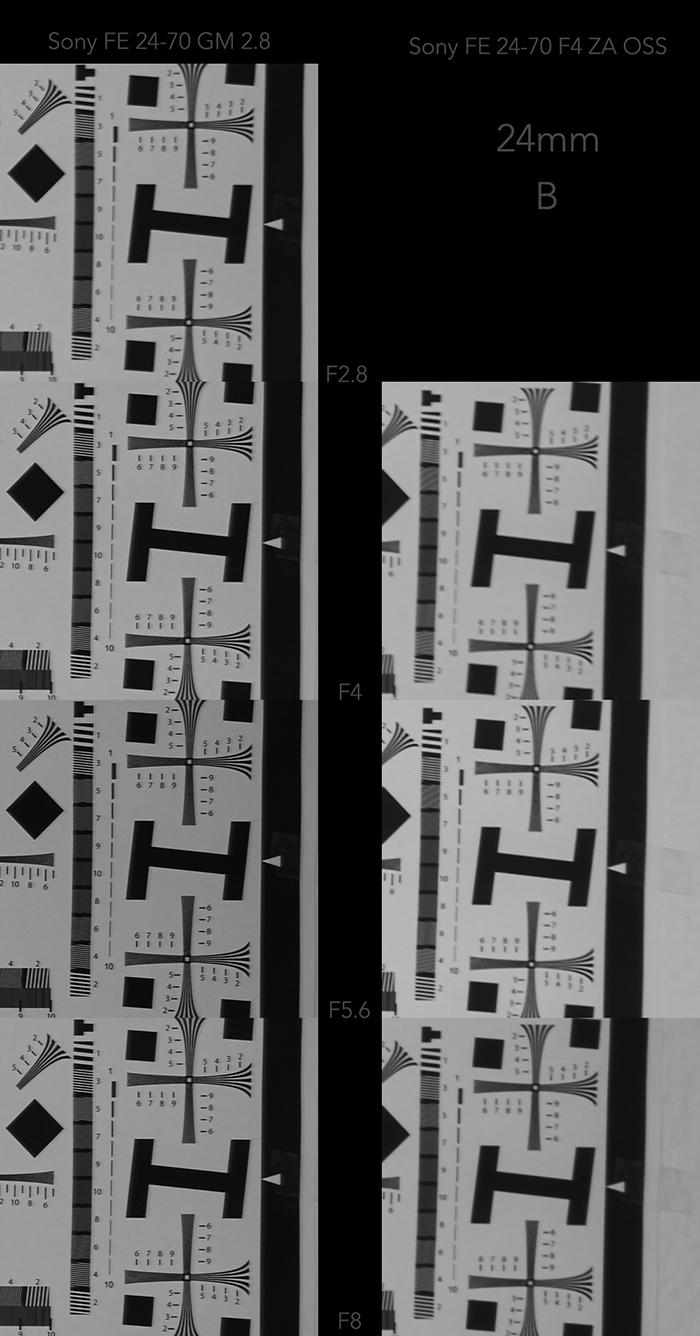
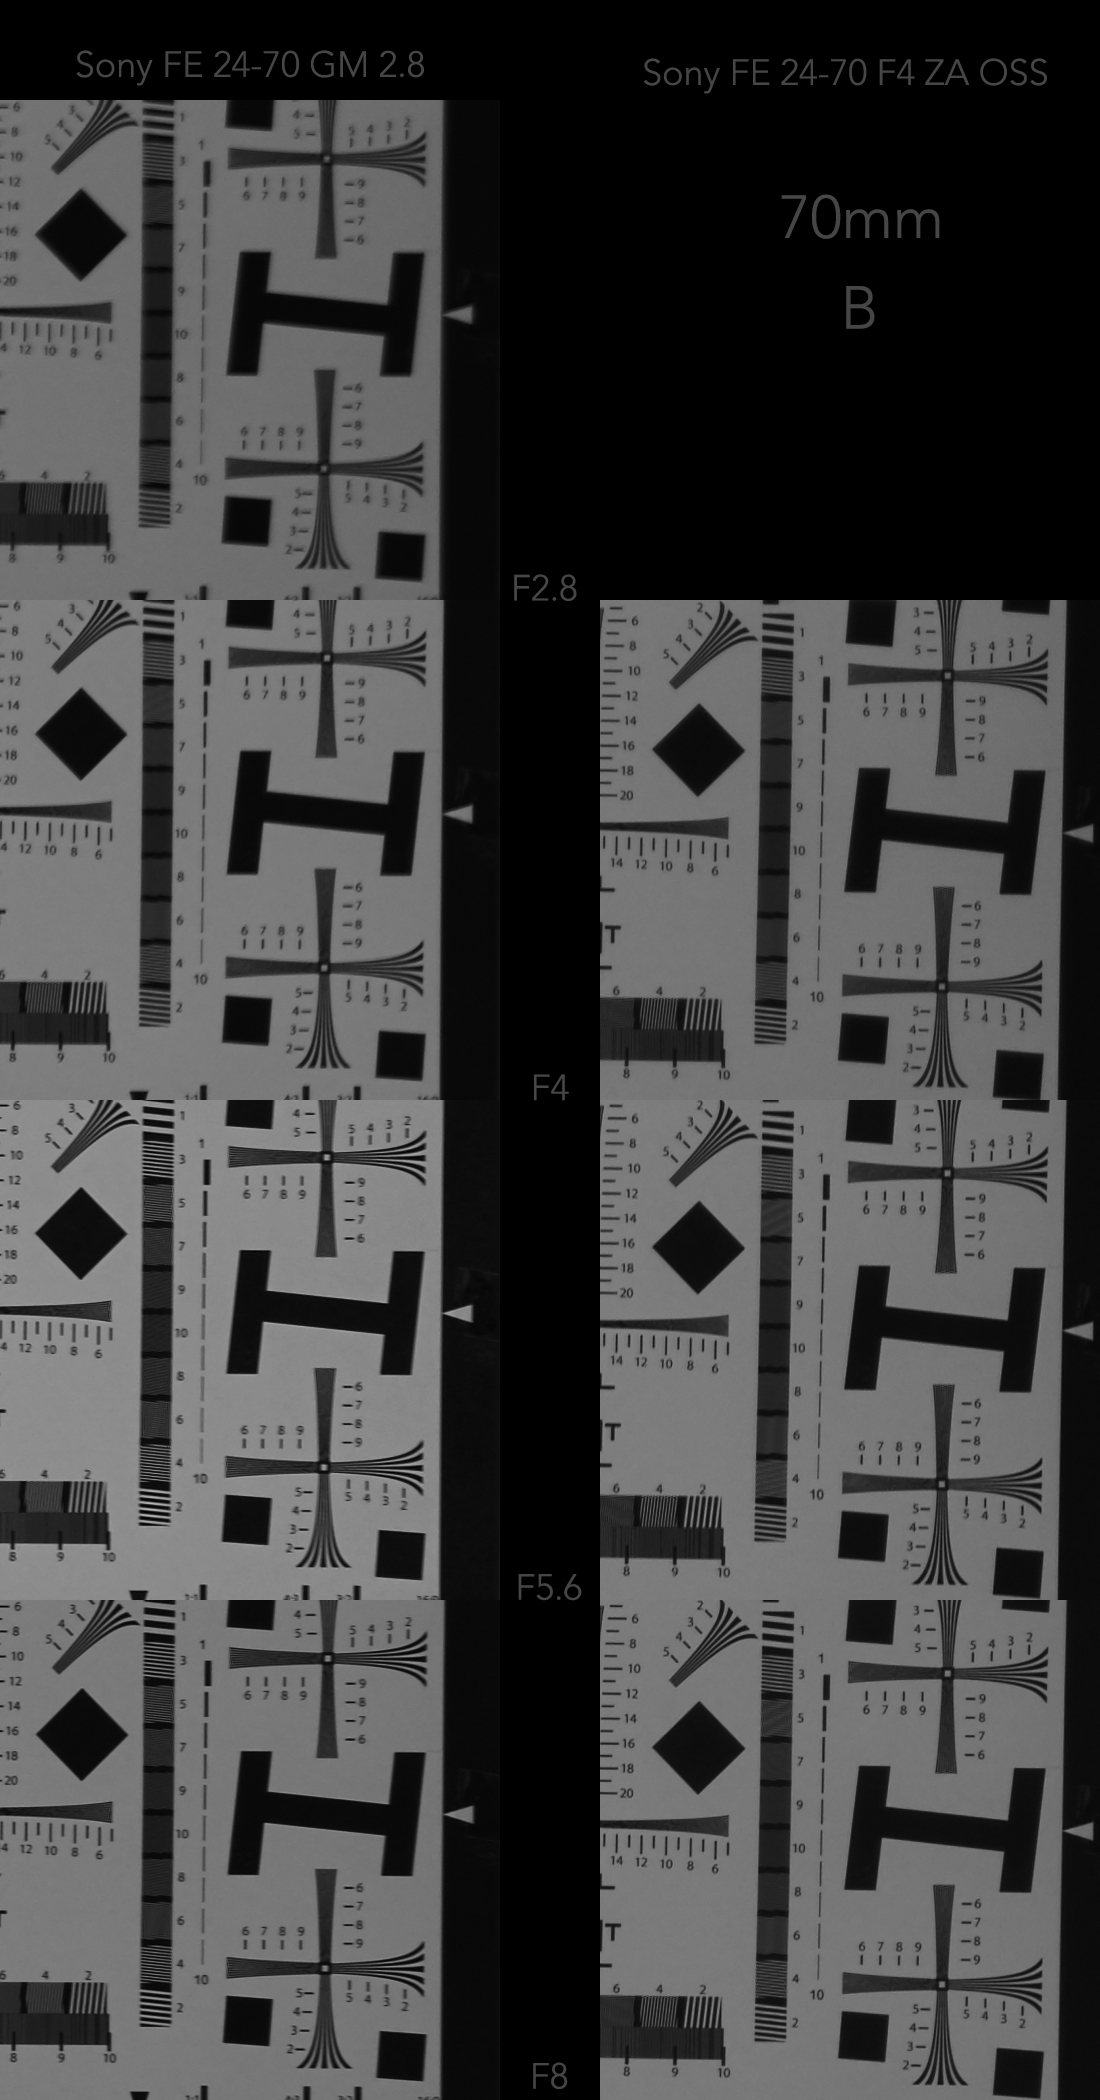
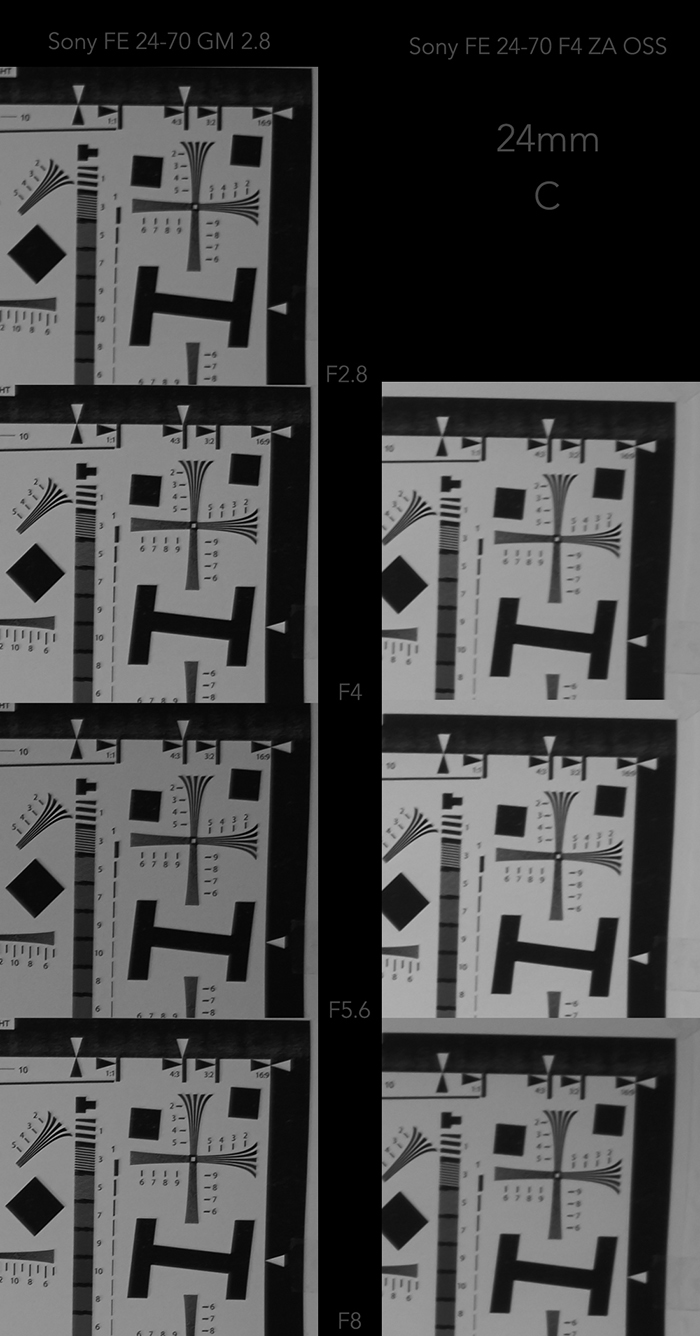
As usually I test new lenses on my testing wall. It is very helpful to find quality issues like with my Sony Distagon T* FE 35 mm F1,4 ZA (check out my test HERE). It also helps me to find strength and weak points of my lenses. I have tested three zones with 24mm and 70mm:
A – Center
B – Edge
C – Corner
To get a feeling for the results I compared this with the Sony Vario-Tessar® T* FE 24–70 mm F4 ZA OSS

overview

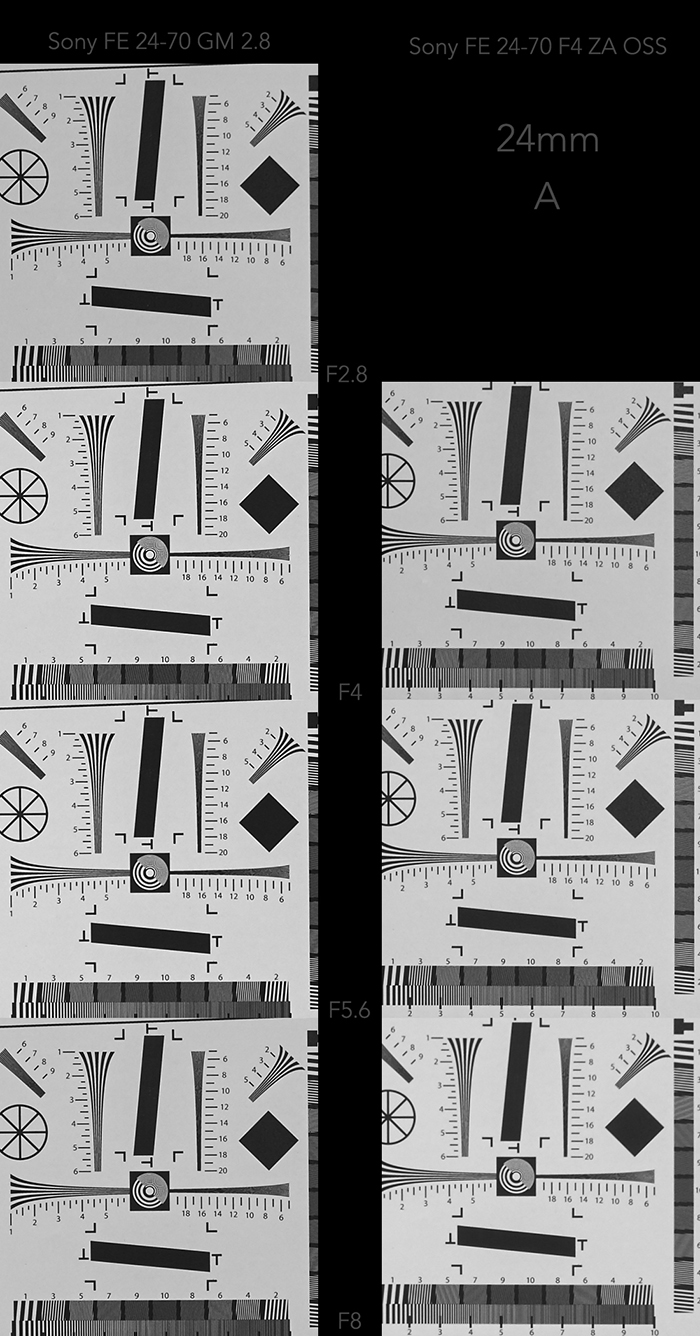
Zone A – the Center
The results are really great. The G-Master is sharp like a prime in the center at 24mm even wide open. The Sony-Zeiss is not as sharp as the GM and has less contrast but the results aren’t that bad.

Sharpness_24_A.big

With 70mm the results are on the same level like with 24mm. The GM has also more contrast and it is sharper. At F2.8 the sharpness is a bit weaker than with 24mm at the same aperture.

Sharpness_70_A.big

Zone B – the Edge
In the edge the results are on another level. The GM is sharp over the full F-Stop range an just a bit softer at F2.8. The Sony FE24-70 F4 is very weak even with F8 it doesn’t reach the sharpness of the GM @F2.8

Sharpness_24_B.big

At 70mm the Sony-Zeiss is much better than with 24mm but still not as good as the GM. The GM is @F2.8 a bit softer in the edge. All in all the results from the Sony FE24-70GM F2.8 are better at 24mm but still nice at 70mm.

Sharpness_70_B.big

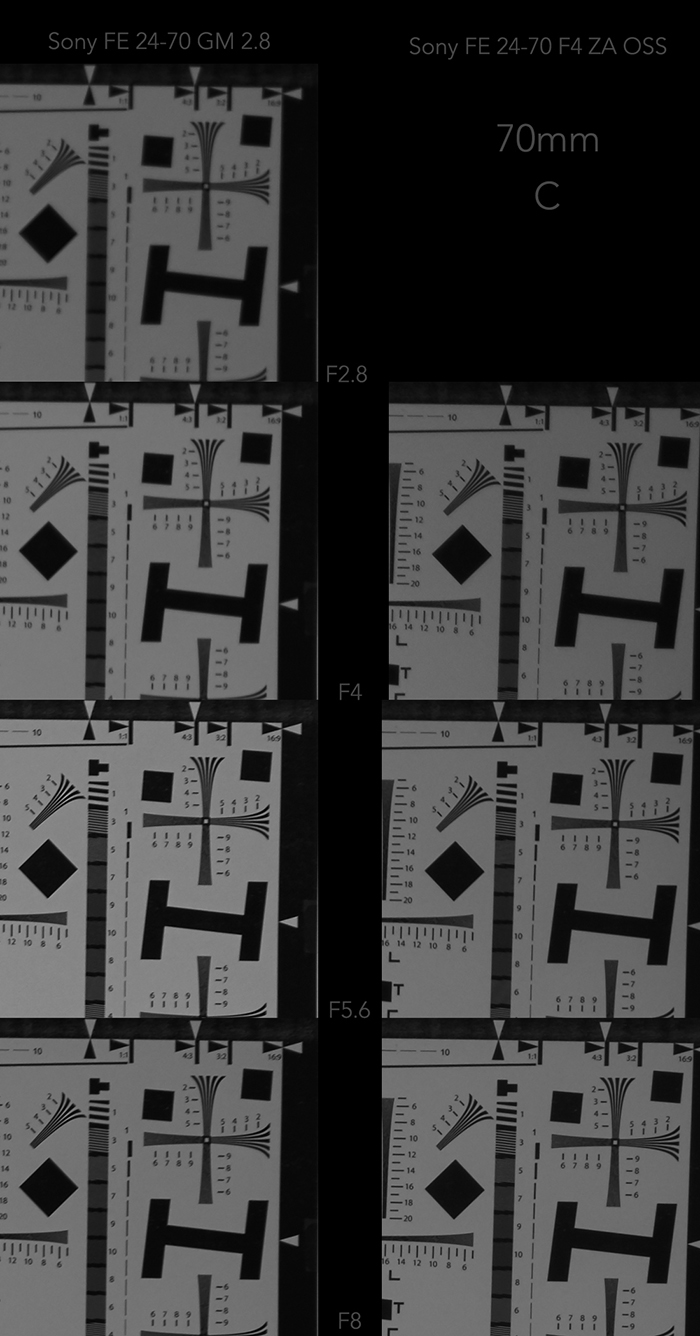
Zone C – the Corner
The last zone shows similar results like the edge. On GM side at 24mm it is better than with 70mm but really good. The Sony-Zeiss is weak at 24mm and at 70m better than I have expected it and equal to the GM.

Sharpness_24_C.big

Sharpness_70_C.big

The sharpness results are all in all very impressive. But this I have expected. LensRentals.com tested also this lens and draw MTF charts of the lens. The results are very similar to mine.

Vignetting
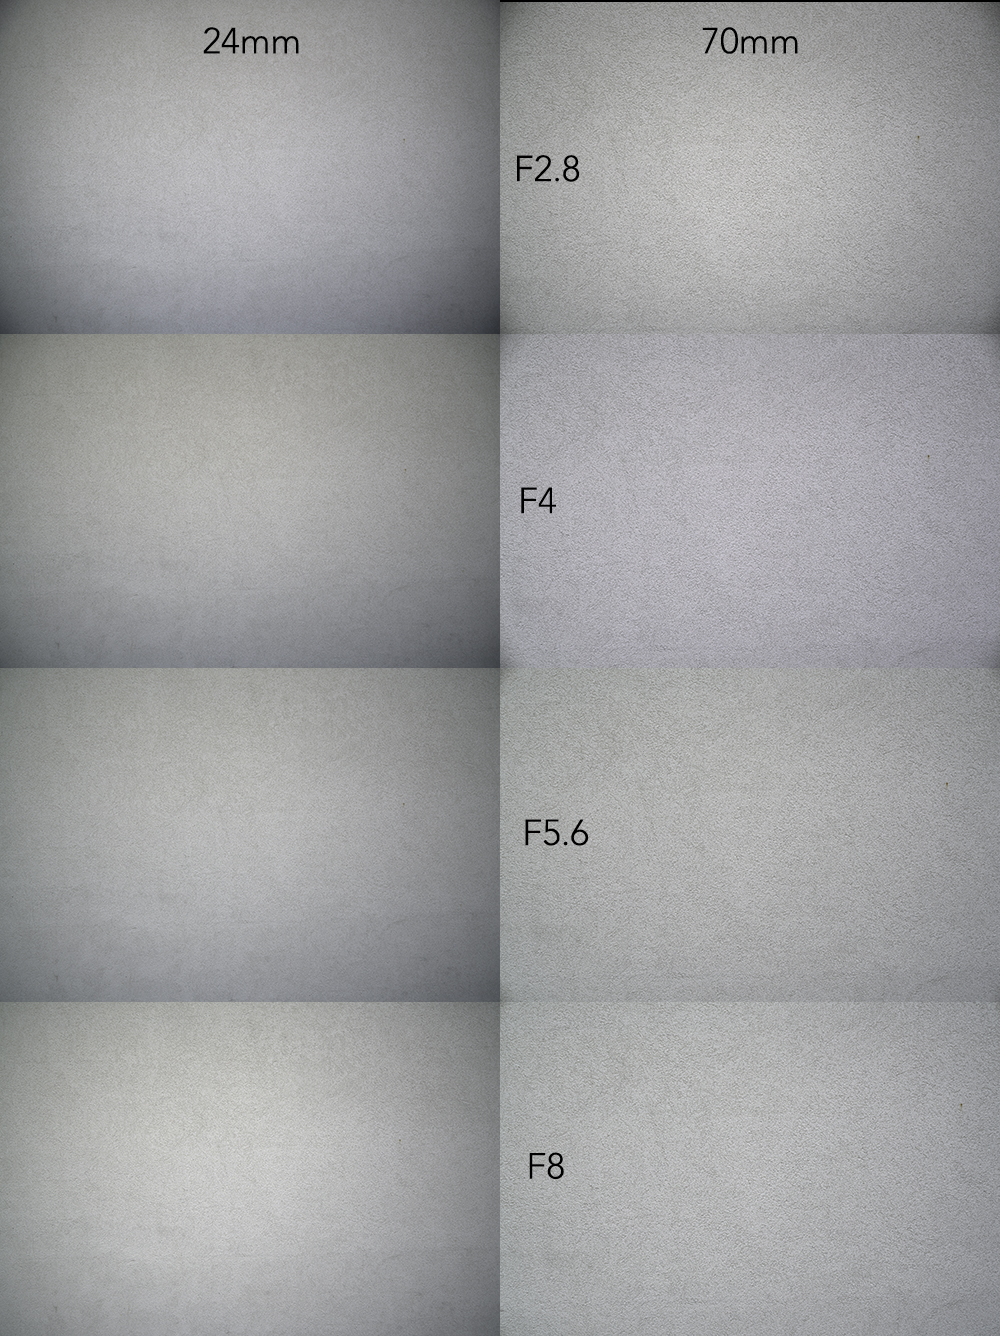
The Vignetting of the lens is very moderate. You can see below, that there is a sightly vignetting at 24mm over the full F-Stop range. The vignetting at 70mm is less and almost gone at F5.6. With applyed correction profile in the camera you won’t see any vignetting in the final image.

vignette

Distortion
There is a sightly barrel distortion visible at 24mm

dist24

At 70mm you will get a minor pincushion distortion.

dist70

It’s almost the same like the vignetting. If you enable the camera inbuild correction profile which is also applyed to the RAW file you will get a clean Image without any distortion.

ehp-58.big

Chromatic Aberrations
Longitudinal Chormatic Aberrations (LoCA | Bokeh Fringing) sadly are hart to correct, the most efficent way to avoid them is to stop down. But let’s take a look into the chart. The shots are taken at F2.8. At 24mm you can see very minor Longitudinal Chormatic Aberrations. It will be hart to find them in a real live picture.

lat_ca_24
(Sony FE24-70 GM F2.8 @F2.8 24mm)

The same shot at 70mm you can see a noticeable amount of Longitudinal Chromatic Aberrations.

lat_ca_70
(Sony FE24-70 GM F2.8 @F2.8 70mm)

Lateral Chromatic Aberrations are visible in the edge and corner, but I don’t care about them, because they can be easily correced in post-processing.

loCA24
(Sony FE24-70 GM F2.8 @F2.8 24mm)

With active inbuild lens correction profile you will get a clean RAW|JPG out of the camera.

loCA24_after
(Sony FE24-70 GM F2.8 @F2.8 24mm)

At 70mm there are no lateral chromatic aberrations even without lens correction profile

loCA70
(Sony FE24-70 GM F2.8 @F2.8 70mm)

Flares
In extreme situations it is possible to create some lens flares, in normal conditions I had no problems.

flare1

flare2

Rendering and Bokeh
If you remember right the Sony marketing says that the lens strengths should be sharpness and bokeh. So lets see what the lens can deliver.
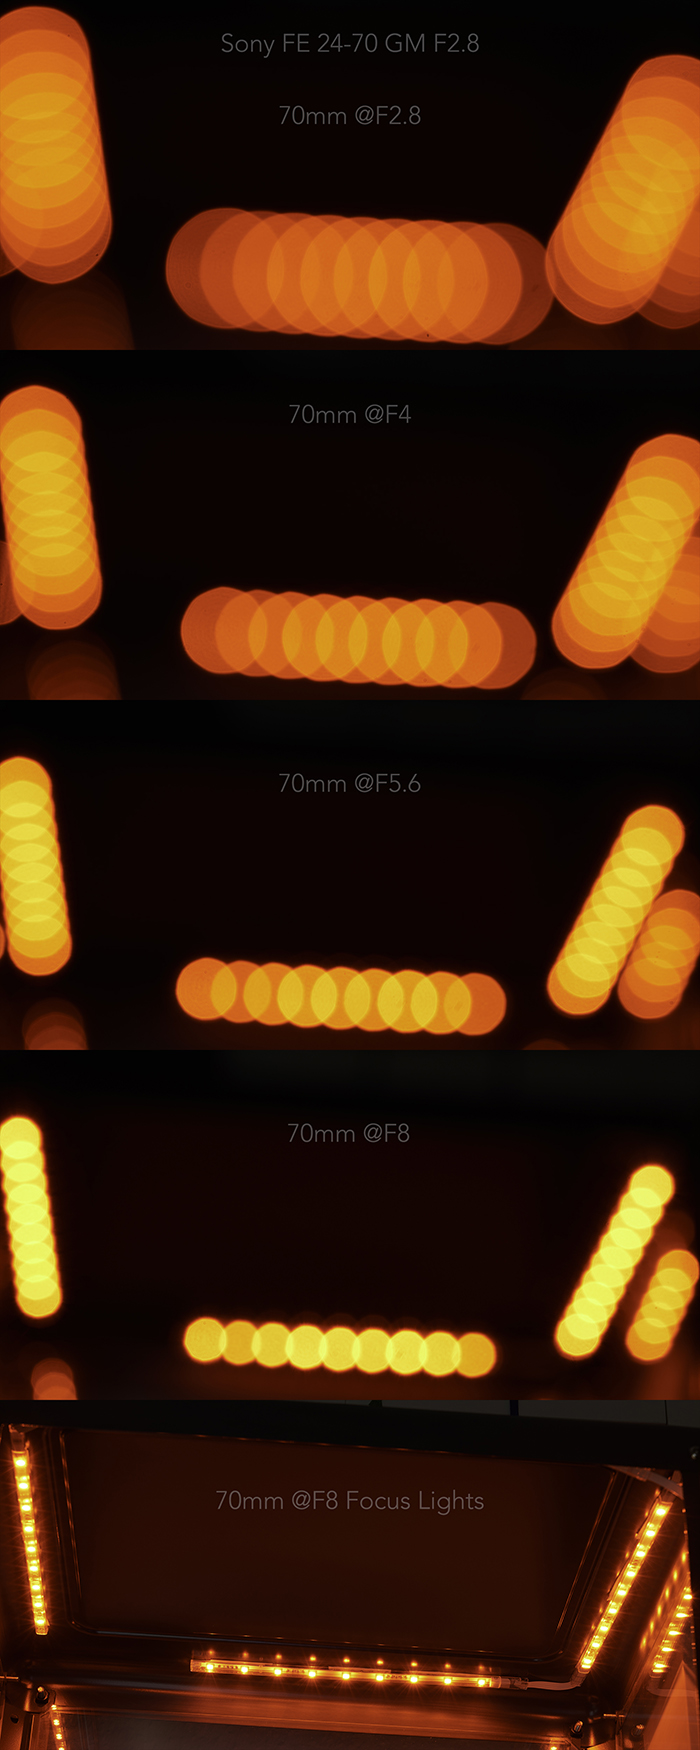
At first I have tested the Bokeh Balls. They should be round and without of onion rings. The results below are very, very good. The bokeh balls are round even at F8 and I also can’t find any problems with onion rings. On focusing the lights I can produce nice sunstars. That looks really good.

bb.big

The rendering of the out of focus areas is very smooth and soft and nothing is getting nervous. The colors are rich and punchy.

ehp-65.big

Conclusions
Till now I really like the lens and I’m happy to own it. It’s crisp sharp over the full range and produce nice and wonderful images. The build quality is very well and the AF is really fast. The weight and size is huge, but not more than other F2.8 zoom lenses. The price tag is very high, but I think you get the best standard zoom lens on market. The existing lens errors are almost not relevant, the only downside is the amount of LoCa at 70mm.
I could help you? Thats great! You want to help me? Please check the link below the blow. *cheers*

Check out the example images at eh-photo.de.

——

Get the the 24-70mm GM lens at [shopcountry 47915].

Street Portraits With The Sony FE 85mm F1.4 GM

The following review is a guest post from Shawn Reynold (tlpserendipity.wordpress.com). To write a guest post follow the instructions on that page. Thanks!

———————-

Finally, the warm weather is here.
The Sun is shining, the birds are singing, and The Hills are alive with the sound of lawn mowers! I really should get out and enjoy the nice weather. But what to do??  Hmmm….
I know! How about hanging out at ‘Times Square North’

above: a beautiful smile

in Toronto) with some friends and playing around with the new [shoplink 47395]Sony FE 85mm f1.4 GM lens[/shoplink]? That could be fun.


A word of disclaimer – I am not a street photographer.  And I do not… usually… take street portraits (that was the point of the outing that day – to “work on a weakness”)

Read more

Zeiss Batis 85mm gets DxOmarked:

Batis85mm

DxOmark posted the full Zeiss Batis 85mm lens results:

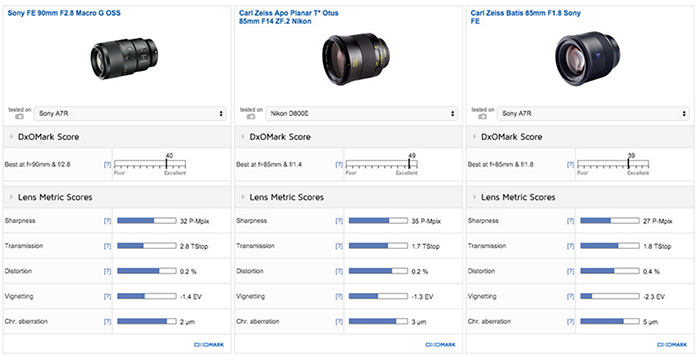
While not cheap, the [shoplink 45791 ebay]$1,199 Zeiss Batis 85mm f/1.8[/shoplink] offers good value for money, considering the solid Zeiss construction, features, and performance. On the A7R, it’s not quite as sharp as the similarly-priced [shoplink 48071 ebay]Sony FE 90mm f/2.8[/shoplink], but sharpness is still very good. What’s more, with improved light transmission thanks to that faster f/1.8 maximum aperture, the Zeiss lens is better suited for low-light event photography, as well as creative portraiture, over the Sony. We can’t wait to pit the Zeiss Batis 85mm and the Sony FE 90mm against the new [shoplink 48072 ebay]Sony 85mm f/1.4GM[/shoplink] just as soon as we get one in the lab.

Batis 85mm at [shopcountry 45791].